Tests for computer hard drive. Methods for checking and restoring a hard drive
Today on the Internet there are many free programs for checking hard drives. They will help you determine if there is a problem with your drive or if you can still use it safely.
You can use the standard Windows error checking tool (aka chkdsk), but it will not give you all the information about the status of your HDD. The Windows check disk scans and eliminates errors in the Windows file system, but does not work with its hardware.
Below we will look at a selection of 14 programs designed to work with both the software and hardware parts of the hard drive, as well as it.
All of them are suitable for diagnosing and troubleshooting the HDD of your computer or laptop.
TOP 14 computer programs that will help you test your hard drive.
 HddScan program interface
 It is a free program designed to test hard drives from absolutely all manufacturers. Thanks to this program, you can test your device and identify read/write errors, bad sectors and much more.
HDDScan has some very useful tools.
- Smart test (SMART test) of surfaces for broken sectors.
- Ability to support RAID arrays, USB flash drives and SSD drives.
- In addition, you will be able to see and analyze the SMART attributes of the hard drive.
- Useful for regularly checking the performance of the hard drive and predicting the time of possible failure.
Features of HDDScan:
Easy to use. Can be transferred to USB. Updated regularly.
3.Disk Checkup.
 DiskCheckup program interface
 DiskCheckup is a free program for testing most hard drives.
Once installed, you can view the reading error rate, temperature and many other parameters of interest. In addition, using this utility you can conduct a quick and advanced disk test.
It allows you to configure notifications to be sent by email when any manufacturer threshold is exceeded. This helps to remotely quickly find out about hard drive problems.
PassMark DiskCheckup™ allows the user to monitor SMART attributes.
Peculiarities:
Hard drives with a SCSI interface or hardware RAID connection are not supported and cannot be detected by DiskCheckup™.
Supported OS: Windows XP/ 7/ 8.1/ 10. Windows Server 2008/2003.
4.G Smartcontrol.
 Gsmart program interface
 This program can perform various hard drive tests, providing detailed results and giving an overall assessment of the drive's health.
The utility has a nice open source graphical user interface (GUI). Works with SMART HDD data.
It is a valuable tool that allows the user to predict and prevent hard drive failures before they occur.
Peculiarities:
- Can work on Apple products
- Installs on the *nix family of systems
Supported OS: Windows XP/ 7/ 8.1/ 10.
5.Test drive for Windows Drive (WinDFT).
 WinDFT program interface
 Test Drive for Windows Drive is a free software designed to diagnose Hard drives. It is suitable for almost all hard drives available today.
WinDFT (or the full name in English Hitachi Drive Fitness Test) has a wide range of applications. Tests both internal and external HDDs, as well as USB flash drives.
Supported OS: Windows XP/ 7/ 8.1/ 10.
6.Samsung Hutil.
 samsung util program interface
 Samsung HUTIL (ES-Tool) is a utility designed for testing hard drives.
It is available as an ISO image for burning to CD or flash drive. Thanks to this, this program is one of the most convenient. It can even be run from a regular floppy disk.
It is a little more difficult to use than other programs because it does not have a regular GUI.
Peculiarities.
The downside of using it is that it can only be used on Samsung Hard Drives.
Supported OS: Windows XP/ 7/ 8.1/ 10.
7.Western Digital Data Lifeguard Diagnostic (c).
 Data Lifeguard program interface
 This utility is free software designed for testing hard drives manufactured by Western Digital.
It is available for installation either through an installer or through a bootable ISO file.
Data Lifeguard Diagnostic for Windows is a simple, free tool. When you extract and click on the executable file, the program opens and checks the system, displaying physical drives and logical drives.
The program is extremely easy to use and understandable even for a beginner.
8.EASIS Drive.
 EASIS Drive Check program interface
 Two main features of EASIS Drive:
- Sector verification test;
- Working with a SMART hard drive.
Using the “second option” you can see more than 40 values of the current HDD.
By using the sector test, you can check the surface of the media and see errors.
At the end of the verification procedure, a special report is generated in which you can see everything you need.
9.HD Tune.
 HDTune program interface
 This program is simple and convenient and is designed for testing HDD drives. It is intended for use on Windows operating systems. Using it, you can check the general condition of the hard drive, run error checks, and perform various tests.
The program is easy to use, supports internal and external storage devices and allows you to copy all found information.
10. Macrorit Disk scanner.
 Macrorit program interface
 It is a surprisingly simple and easy-to-use program. Installation and operation with it will not be difficult. Using it, you can check for bad sectors on your hard drive.
It is extremely clear, and a clear advantage compared to competing programs is the lack of installation required. On the screen you can see the scanning progress and inspect problem areas.
Also, during the scanning process, you can monitor the time until it is completed. After scanning, you can turn off the computer in automatic mode.
Supported OS: Windows XP/ 7/ 8.1/ 10.
11.Fujitsu Windows Diagnostic Tool (For IDE/ATA/SATA Hard Drives).
 Fujitsu Diagnostic program interface
 Fujitsu Diagnostic Tool is a program available in only two formats, one runs on Windows OS, the second runs from a flash drive or from an optical disc.
You can use the latter regardless of what OS is installed on the HDD.
It is an excellent hard drive diagnostic tool that you can download, install and use for free. A special feature is the ability to work only with Fujitsu hard drives.
Using it, you can conduct two tests to identify problems with your hard drive: a quick test and a full test. They have different verification times.
You can use this tool in all versions of Windows, from 2000 to 10.
12.Checking built-in Microsoft Windows errors.
Using it is quite convenient to check errors on the Windows operating system. Most often this check is called scandisk. It is especially convenient to use it if your system has stopped booting. With its help, you can eliminate operating system errors and, if possible, transfer information from the broken area.
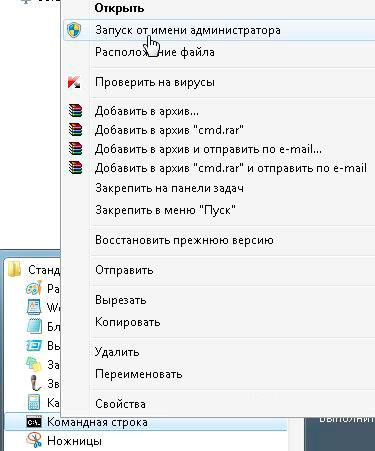
You can call the Microsoft Windows file system and error checking program using the command line. Using the key combination WIN+R, open the “Run” window and the command cmd or right-click on Start and call “Command Prompt (Administrator)”. In the window that opens, select a logical drive and enter the command chkdsk /f. Enter
13. Barts stuff test.

This utility is a free stress test for the Hard disk. It will serve as a very worthy addition to the general arsenal of utilities designed for testing the hard drive.
In general, it is considered to be used only for testing on operating systems of the Windows family, from 95 to XP. But, as experience shows, it can also be used for testing in Windows 8 and 10.
14.Ariolic Disk scanner.
 Ariolic Disk program interface
 Using this program, you can check your hard drive for read/write errors and find bad sectors. This program providesa minimal interface with only one button, so this program is extremely convenient and understandable. It is portable, so it does not require installation. All that can be said about it is that it displays files with read errors. Therefore, if there are none, you will not be able to extract more useful information about your disk.
Compatible with Windows 10 and XP, but also works with some other versions of Windows.
To avoid losing information from your hard drive, treat it with care - do not throw it, do not subject it to acceleration during operation (do not sharply understand or lower it). Use the best free HDD testing and diagnostic software.
Categories Post navigationHello dear readers, today I would like to show you how to test your hard drive and fix it. The Hdat2 program will help us with this.
If you only need to check, then use .
I will say one thing, if you are looking for a program for Windows, then you are wasting your time! Hard drive testing software can only test. But there is no way to fix your hard drive from bad sectors directly in the operating system.
How to understand that you need to test your hard drive
I very often encounter this problem when people’s information on their HDD starts to deteriorate, the computer starts to slow down, freeze, and then I have to test the equipment. Of course, the first thing you need is, but if it is in order, then almost the remaining percentage falls on the hard drive.
So, let's look at a program that will help you. I will be looking at HDAT2 version 4.53. She helped me out many times and not only me. That's why I won't give you any bad advice.
First, download the program and write it to a flash drive or disk; you can see how to do this in the articles:
Now download a free image of the program for testing and repairing hard drives:
Hard drive test program
In general, if you recorded it, we launch it... I launched it from Hiren’s Boot CD 15.1 and it looked like this:


Now select Check and Repair bad sectors.

The program will begin testing the hard drive, progress will be visible as percentages.

If your stripe is completely blue, then this is good, if not, then at best, the damage will be software and hard drive testing program will fix everything successfully. If not, you will have to buy a new hard drive.
My hard drive was error-free and the program for testing hard drives produced the following result:

The yellow cells are warning cells; there are 0 of them indicating an imminent failure of the hard disk sector.
Red cells that indicate the sector is faulty are also 0.
And accordingly, the green cells indicate that the sectors are corrected 0, because there were no casualties.
This is what a good hard drive should be like.
That's all. I will say one thing: the best program for testing hard drives is different for everyone, but I recommended using this one because... She often helped me out, even helped me when Windows didn’t want to boot at all.
A computer or laptop is associated specifically with errors and malfunctions in the hard drive. In this article, we will figure out how to check the health of your hard drive using Windows tools and programs specially designed for this.
Checking for errors using standard tools
This method is equally effective for Windows Xp, Vista, 7, 8 and 10. Required:
If the notification “Windows cannot scan the drive that is currently in use” appears, click “Schedule scan”.
So now we do a reboot, and when the system boots, it will run a performance test through the BIOS and fix media errors. Its duration can range from 2-3 minutes to an hour, depending on the characteristics of the hard drive and its capacity.
Checking the hard drive for errors via the command line
To start the scan, you must complete the following steps: go to “Start/All Programs/Accessories/Command Prompt”. Right-click and click “Run as Administrator”. There are also.
In the window that appears, execute the command “chkdsk disk_partition: scan_parameters”. Please note that this method only works with disks that have been formatted in FAT32, NTFS or RAW (this format).
An example command is “chkdsk C: /F /R”. Its essence is as follows:
- Section C will be checked for errors;
- Any problems found will be automatically corrected (parameter F is responsible for this);
- Damaged sectors will be checked and information will be restored (parameter R);
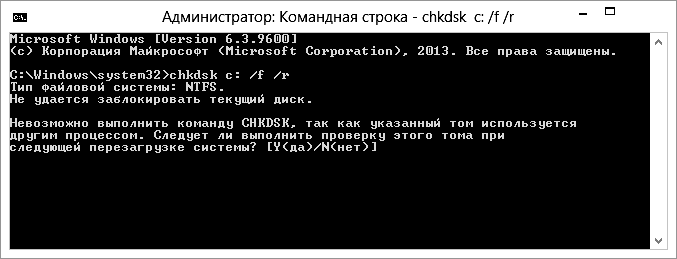
If you want to diagnose the drive currently being used by the system, you will see a special notification. You will be prompted to run the scan the next time you boot your computer. To agree with this, press Y, to refuse - N. Based on the results of the check, you will have access to information about the verified data, the number of damaged sectors and errors found.
To get a complete list of options, run chkdsk with a question mark as an option. But if you need a regular check for errors and sectors, then the above information will be enough for you.

It happens that errors found during scanning cannot always be corrected immediately; it is likely that this is due to the program running at that time. In this situation, an offline scan of the drive will be required: it is disconnected from operation, diagnostics are carried out, and then it is connected back. To do this, you need to enter “chkdsk C: /f /offlinescanandfix” (C: - disk partition) into the command line. If it is not possible to disable it, the check will be performed at the next reboot.

If necessary, after the inspection you have the opportunity to study the inspection log. To do this you need:
- Go to Windows/Applications Logs;
- Right-click on Application/Search;
- Search for the word Chkdsk;

Software check
Of course, the above method is not always effective. Therefore, we will look at a number of programs such as Victoria. They will allow you to conduct the most thorough analysis of the condition of the hard drive on your computer or laptop.
Victoria

A utility for diagnosing and testing hard drives. It will help you not only detect problems in its operation, but also eliminate them.
The program has a number of advantages and useful functions:
- Reads the hard drive passport and provides detailed information;
- 5 diagnostic modes;
- Eliminates crashes;
- Displays unstable areas;
- Hides defects;
- Evaluates media performance.
Victoria is one of the best today. It can solve problems with bad sectors and quickly bring any type of hard drive into working condition. However, it was dedicated to her, which I definitely recommend reading.
HDD Regenerator

One of the most effective programs for assessing the status and troubleshooting drives. It makes it possible to obtain information about the current SMART status of the selected device and complete control over it.
Among the main features are:
- Simple and intuitive interface;
- Complete security;
- NTFS and FAT support;
- Pre-scan mode;
HDD monitoring in real time;
That is, with the help of a regenerator you can test the hard drive as efficiently as possible.
TestDisk

Designed to determine the status and test drives. In addition to simple diagnostics, it also detects bad sectors and corrects any errors found. Its main functions include:
- Perform an analysis of the current state of the hard drive;
- Search for bad sectors;
- Recovering deleted partitions;
- MFT fix;
Checking external hard drives;
In addition, the utility has a number of functions that are related to the recovery of deleted files.
Hitachi Drive Fitness Test

An excellent program designed to find and fix problems on drives. It is universal, since diagnostics of any drives can be carried out. With its help, you can very quickly find out the current position of the hard drive, as well as obtain additional information about it.
Includes:
- Quick but thorough check;
- Support for all components;
- Monitoring;
- Data statistics;
This utility is suitable for all devices and can even be used on a netbook.
Seagate Seatools for Windows

Used to check and test the status of the hard drive. She finds any problems and failures.
- The utility can fix:
- Equipment incompatibility;
- HDD file system violations;
- Errors in installed drivers;
- , which infect the file system;
In addition, it provides complete information about the media and all related indicators. According to the developers, this utility is incredibly effective at independently correcting minor problems, SSD and HDD errors, and is capable of completely restoring their functionality.
There are other very effective utilities, for example, . The main advantage of which is that it works from under DDOS, which completely eliminates possible inaccuracy of data during testing.
So, now you have complete information on how to determine whether your hard drive is working properly, and how to solve the problems associated with it yourself. Choose the option that suits you best or the one you like and act!
Video: we carry out a complete diagnosis of the HDD
The computer hard drive is a very sensitive component. Errors that appear in its file system, bad sectors on the surface, and mechanical problems sometimes cause a complete failure of the computer system.
The same problems are typical for flash drives, which in essence are practically no different from a hard drive. How to determine the presence of errors and bad sectors and how to correct them if possible?
Just a little bit of theory
Many people simply confuse file system errors and bad sectors. Therefore, we will try to explain the difference between these phenomena and the reason for their occurrence. We will also determine what the symptoms of errors that appear on the surface of the hard drive may be.
File system errors
When people talk about hard drive errors and trying to fix them using the chkdsk utility built into Windows, they most often mean file system errors. Such errors are associated with problems in the metadata that describe the file system itself: errors in the $Bitmap, $BadClus files, the main file table, and various indexes.
For example, errors in the $Bitmap file of the NTFS file system can cause the system to incorrectly recognize the amount of free space on a volume. And problems with the $BadClus file can lead to incorrect identification of bad sectors and an attempt to write data to such sectors, which will cause the computer to completely freeze.
Bad sectors
The nature of bad sectors is somewhat different. The hard drive is “cut” into sectors at the factory during production. It is then that its logical structure is created, then it receives magnetic properties for recording data. These structures become faulty as a result of the gradual degradation of areas of the surface of the hard drive, which become so due to careless handling of the hard drive, which was accidentally dropped on the floor or was hit on the case even with an ordinary screwdriver.
Testing programs that fall on parts of a degrading surface detect so-called faulty or damaged sectors - bad sectors. Sectors that have lost their magnetic properties do not allow data to be read or written to them. It is possible to eliminate faulty hard drive structures. For this purpose, manufacturers create special reserve areas of sectors. When a bad sector appears, diagnosed at a specific address, its address is reassigned to a sector from this reserve area.
Symptoms of errors and bad sectors
We have already talked a little about the symptoms of file system errors above. However, the symptoms are sometimes very varied. Here are some manifestations of errors and bad sectors that have arisen in the hard drive.
- Noticeable freezing of the operating system when performing read and write operations.
- Failure to load the operating system. For example, downloading continues only until the download notification and Windows logo appear.
- Frequent occurrence of errors in the operating environment.
- Extremely slow and unproductive operating system.
Here is a far from complete list of error manifestations associated with file system problems and the presence of degrading areas of the hard drive. What to do in such cases?
Checking errors using Windows
Checking and correcting file system errors in Windows is carried out by a standard utility of this operating environment called chkdsk. It can also be useful in eliminating programmatically generated bad sectors as a result of viruses. It can be launched both in a graphical environment and from the command line. Let's consider the most accessible option for performing it in a graphical environment.
Checking an inactive volume
Checking an inactive volume is the simplest. It can be done entirely in graphical mode. By inactive volume we mean a partition on which the currently running operating system is not installed. This could be another connected hard drive or, for example, drive D.
Click the "Run check" button.
The utility is launched from the “Service” tab of the volume properties. This tab contains the “Run check” button. If you click it, the chkdsk utility window will open. To check bad sectors that appeared as a result of software errors, you need to check the box next to the corresponding option. Next, just click the “Run” button - the utility will check and correct errors.
The chkdsk utility checks volume D, also diagnosing bad sectors.
Checking the system volume
Checking and correcting errors on the system volume, where the operating environment valid at the time of checking is located, is carried out a little differently. The utility identifies such a volume as mounted, and therefore warns that it cannot perform the check, but offers to perform it during the next reboot.
The chkdsk utility reports that it cannot scan the disk.
After restarting the computer, the user will find that during boot, after the Windows logo appears, a black screen appears. This black screen is gradually filled with lines of text. This is the chkdsk utility that checks the system volume of the hard drive. After checking and making the necessary corrections, it will show the result, and then the operating system will continue loading.
The chkdsk utility checks volume C after a reboot.
Programs for checking hard drives for bad sectors
There are a number of applications on the software market that can test the surface of a hard drive. In this case, not just one volume is tested, but the entire surface of the hard drive. Of course, the user can independently set the boundary sectors and test individual areas. To identify bad sectors, a sector read test is usually performed.
Important: the results of the test for the presence of bad sectors must be considered in conjunction with SMART indicators, such as Reallocation Sector Count, Reallocation Event Count.
Data Lifeguard Diagnostic
This utility was created by Western Digital developers. It is available for download on the company's official website. Lifeguard Diagnostic works great with hard drives from almost any manufacturer, and not just native WD hard drives, as one might think. It offers a number of tests: Quick, Advanced, as well as the ability to fill hard drive sectors with zeros.
Interface of the Data Lifeguard Diagnostic utility.
We are most interested in the extended test. This test allows you to detect bad sectors on the surface of disks. When the program finds a bad sector, it informs the user about it, asking him to choose whether he wants to fix the detected error. If it agrees, then the application writes to sector 0, so the sector data will be lost.
A selection of utility tests. We need Extended Test.
This test takes longer than the quick test. Testing time depends on the size of the drive, since the test is carried out on the entire surface, starting from sector 0 and ending with the maximum LBA value.
Extended Test utilities in operation.
HDDScan
The HDDScan application also seems to be an excellent hard drive surface tester. It can often be seen as part of entire software packages such as LiveCD. This application has a graphical interface and offers a number of tests, among which, in our case, the most interesting is “Surface Tests”.
Select the Surface Test from the drop-down list.
Important: when conducting surface tests under Windows, you must close all running programs to avoid random results during the test caused by the action of these programs.
After selecting a test, an additional window will open, which presents the test parameters. Let's leave the “Read” option enabled, which will only allow us to read data from sectors. Thus, we will define sectors from which information cannot be read within a specified time (bad sectors), frozen sectors and normal cells. We will leave the fields of the initial and final sectors unchanged if we want to check the entire surface.
Let's leave the Read test option enabled.
When testing with this program, a number of sectors are identified:
- bad sectors,
- stuck sectors, reading data from which takes more than 500 ms,
- sectors with reading time from 150 to 500 ms,
- sectors with reading time from 50 to 150 ms,
- sectors with reading time from 10 to 20 ms,
- HDDScan considers sectors whose data is read within 5 ms to be normal.
The program test result is available in the form of a line graph, a sector distribution map, and also as a regular text report.
Checking the hard drive surface.
Ashampoo HDD Control
Unlike the programs discussed above, HDD Control is not a free program. This application is a whole set of tools designed to restore the health of your hard drive. This program also offers the ability to test the surface of the hard drive.
Select the "Surface Test" option.
The test is very simple and accessible to the average HDD Control user. To start it, you just need to click the “Surface Testing” button. It lacks additional options that would allow you to customize the type of test. During testing, only two types of sectors are identified: with excellent reading results and bad sectors.
Victoria HDD
Victoria considers the health of the hard drive being tested to be "GOOD".
This application can collect information about the SMART health of your hard drive. It also allows you to test the disk surface, reassign damaged sectors using the Remap operation, and reset bad sectors. It also divides sectors into groups:
- bad sectors (Error),
- stuck sectors with a read time of more than 600 ms,
- freezing sectors with read times from 200 to 600 ms,
- sectors with reading time from 50 to 200 ms,
- sectors with reading time from 20 to 50 ms,
- Victoria diagnoses normal sectors within the framework of data reading up to 5 ms.
To test your hard drive, you can run this program in Windows graphical mode. Next, you will need to select the “Tests” tab. This is where the surface tests are located. There are four options available for working with the hard surface:
- Ignore,
- Remap
- erase,
- Restore.
First of all, you can perform the Ignore test to determine whether there are bad sectors on the surface of the hard drive. If they are, then you need to start the Remap test. This test will allow you to reassign the addresses of damaged sectors to the reserved area, where normal sectors are located.
Types of available tests and sector categories. Victoria checks the surface.
If, after the Remap test, Victoria continues to diagnose bad sectors, then you can still try to restore their functionality by using the Restore test. The Erase option should be used wisely under Windows, as it writes zeros to sectors - erases sector data. It can only be used within a certain selection of sectors, the data of which is not related to the operating system.
Brief summary
It should be noted that there is a difference between errors eliminated by the chkdsk utility of the Windows operating system and bad sectors eliminated by programs such as Victoria HDD. The former are caused by file system problems, and the latter are often the result of the loss of magnetic properties of sectors of the hard drive surface and its gradual degradation. However, chkdsk can also fix some problems with bad sectors.
To eliminate bad sectors, you can use such applications as: Data Lifeguard Diagnostic, Ashampoo HDD Control, HDDScan, Victoria. We highlight the Victoria HDD application as the best for checking and eliminating bad sectors, as it offers a number of tests: Ignore, Remap, Erase and Restore. It allows you not only to detect faulty hard surface structures, but also to treat the HDD.
The hard drive is an important, but far from perfect, component of a personal computer. For some users it does not work reliably, it crashes, data from it is lost or is significantly damaged. One of the most common problems with a hard drive is the appearance of so-called “broken” (bad) sectors on it, which become a “headache” for many users. In this article, I will talk about the reasons for the appearance of bad sectors on a hard drive, list a number of programs that allow you to recognize them, and also explain how to check a hard drive for bad sectors on your PC.

What are “bad sectors”?
As you know, a traditional hard drive consists of several rotating magnetic disks, over which magnetic heads move, magnetizing some part of the disk and thus writing information onto it (in the form of zeros and ones).
The disk itself is divided into tracks, and the latter, in turn, are divided into sectors onto which the information the user needs is recorded.
Due to certain reasons (I will list them below), information from a number of sectors cannot be read by the hard drive. Such sectors receive the status of “bad sectors” (bad sector), and the system tries to either restore the functionality of such a sector (restore), or reassign the address of such a bad sector to the backup sector (remap), or completely clean up the bad sector (erase). In the case of remapping, spare workable sectors are usually located at the end of the hard drive, and the hard drive spends additional time accessing them, which inevitably affects the speed of the hard drive and the loading of various applications and programs. Next, I will tell you how you can check your computer’s hard drive for bad sectors.

Reasons for bad sectors
What are the reasons for the appearance of bad sectors on an HDD disk? Usually they are as follows:
- Gradual “shedding” of the surface of the hard drive due to its wear, due to which there are more and more bad sectors on the disk;
- Physical impact on the hard drive due to various types of external shocks;
- Power surges in the network, which directly affect the violation of data integrity on the hard drive and lead to the appearance of bad sectors;
- Incorrect shutdown of the computer (improper operation), as a result of which bad sectors appear on the hard drive.
Symptoms of bad sectors
Due to the reasons described, there are more and more bad sectors on the hard drive, which begins to directly affect the operation of the operating system. In particular, you may notice the following:
- The system boots slowly;
- The system slows down (freezes) when reading and writing data from the hard drive;
- The system refuses to boot at all (quite often in the middle of the process);
- The computer sometimes restarts for no reason;
- Various errors regularly occur while the OS is running.
After we have described the symptoms and reasons for the appearance of bad sectors, let’s move on to a description of how to check a hard drive for bad sectors.
The best ways to check your hard drive for bad sectors
So how to check bad sectors (and fix them)? Below I will describe a number of methods that have proven their effectiveness in working with various hard drives.
Method 1. Use the CHKDSK system utility
The easiest and most convenient way to find and fix bad sectors on an HHD hard drive is to use the functionality of the CHKDSK system utility.
- To take advantage of its capabilities, launch Explorer, right-click on an inactive volume (on which there is no operating system installed), and select “Properties” from the menu that appears.
- In the window that opens, go to the “Service” tab, there click on the “Run check” button.
- Check the boxes next to the two verification options, click on “Run”, and wait for the process to complete.

The same can be done for the system volume (on which the OS is installed). The only thing is that this may require a system reboot, but after the system reboots, it will begin checking the disk for bad sectors.
You can also run CHKDSK through the console. To do this, run the command line as an administrator and enter:
chkdsk c: /f /r - (instead of: if necessary, specify a different letter of the problem drive) press enter and wait for the process to complete.

Method 2. Use the Victoria HDD program to analyze and treat the disk
Victoria HDD is probably the most popular program for checking a hard drive for bad sectors (and even for restoring the latter). It effectively checks and repairs bad sectors, has good reviews from experts, and can be used in both classic graphics mode and DOS mode.
One of the Wiki bonuses is the ability to read the SMART indicator of your hard drive, which allows you to monitor in sufficient detail the degree of its performance (the “SMART” tab of the program). In addition, the Victoria program performs “remapping” (reassignment of damaged sectors), resets bad sectors, conducts a detailed test of the hard drive surface, ranking sectors into different groups depending on the speed of reading information from them.
- To use this program, download and run it.
- Then go to the “Test” tab, select “Ignore” there and check the surface for bad sectors.
- If such are found, you should select the “Remap” mode in the same tab, this will allow you to reassign addresses from bad sectors to backup ones.
- If, after remapping, bad sectors remain, you can try to restore them using the “Restore” function, while the “Erase” function completely erases data in bad sectors, writing zeros there.
In general, the functionality of “Victoria” is quite extensive, and to get a full description of it, you need to go to the material specifically about using the program.
Method 3. Use the HDD Scan program to check the hard drive for bad sectors
Another program that can check a hard drive for bad sectors is HDD Scan. This is a fairly popular utility that offers several different tests (Surface Test, Smart Offline Tests, etc.). Select Surface Test, check the “Read” box on the right and run a disk surface test.
The program will analyze the response time of the available sectors and give us the result in graphical mode.

Method 4. Check your hard drive with HDD Regenerator
The HDD Regenerator program allows you to check and restore data on your hard drive, the same applies to bad sectors. I note that the program is paid, but those interested can search for free options online.
- To take advantage of the program’s capabilities, you need to launch it, select the disk to work with, decide on the scanning mode (I recommend Normal Scan), and then select the “Scan and repair” option.
- Then it will be necessary to specify the scanning boundaries (starting from sector 0) and monitor the scanning process itself.
- Depending on the response speed, sectors will be marked with different letters and colors.

Method 5. Scan the disk with HDD Health for damaged sectors
Another program for checking the disk surface for damaged sectors. HDD Health analyzes the general condition of the disk, provides detailed statistics on available partitions (using SMART technology, including the general state of the structure, disk rotation temperature, the presence of bad sectors, and so on).
The icon of the running program is located in the system tray, and the program itself notifies the user, as necessary, of any problems in the operation of the hard drive.

Recovering a hard drive, removing BAD (bad) sectors [video]
Typically, checking a hard drive for bad sectors is carried out using special software tools, the Victoria HDD level or HDD Regenerator. The most effective of all the programs listed in the article, Victoria HDD, allows you not only to check the surface of the hard drive for bad sectors, but also to restore them, remap them and clean them. If bad sectors begin to appear on your hard drive, then I recommend using the functionality of the above programs; they have proven their effectiveness in working with the hard drives of many users.